Personal tools
Document Actions
Using the Meeting Maker 8.5 Client on Windows and Mac OS X
About the MeetingMaker Client
The MeetingMaker Client works on Windows and Mac OS X computers, and can be used from on or off campus.
You can sync your MeetingMaker Calendar with PalmOS PDAs if you would like to.
Getting Started
- Signing in
- Changing your password
- Changing Preferences
- Entering your User Information
- Changing Display Options (font, size, etc..)
- Changing Window Splits
- Exiting MeetingMaker
Using Activities and Banners
Working with Others in Meeting Maker
- Creating a Favorites list (formerly Quicklist)
- Proposing a meeting
- Responding to an invitation
- Inviting guests
- Changing an activity to a meeting
- Working with proxies
Getting Started
Signing in to Meeting Maker
-
Launch Meeting Maker.
- On Windows, go to Start > All Programs > MeetingMaker > MeetingMaker.
- On Mac OS X, click on the desktop. In the Menu Bar, select Go > Applications. In the Applications folder double-click on the meetingmaker folder, then double-click on the Meeting Maker Calendar application. Once Meeting Maker appears in the dock, if you wish to keep it there, click and hold on the icon then select Keep in Dock from the menu that appears.
-
Once you launch the program, you will see a login box similar to the one below.
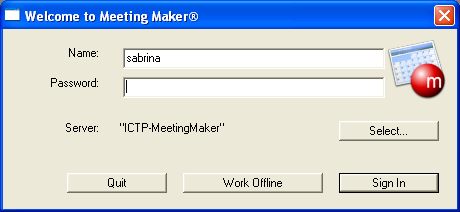
- Enter your MeetingMaker username and password, then click Sign In.
Changing your password
You should change all your passwords, not just your MeetingMaker password, on a regular basis. Recommended to choose a 4 to 6 letter word and inserting 2 numbers in the middle to make it more secure.
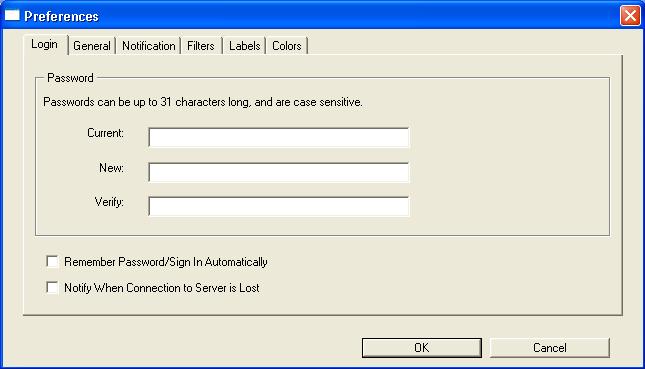
- Pull down the Edit (Windows) or MeetingMaker Calendar (OSX) menu and select Preferences.
- In the Login tab, enter your current password in the Current field.
- Enter your new password in both the New and Verify fields.
- Click OK to accept the new password. The change will be immediate and take effect the next time you login to MeetingMaker
Changing Preferences
Under the Edit (Windows) or MeetingMaker Calendar (OSX) menu, select Preferences...
-
General tab:
- If you want to see names listed First Name, Last Name uncheck Show last names first.
- In the Proposals section, if you check Auto-accept during free time, when you are invited to a meeting and are available, MeetingMaker will automatically accept the invitation and schedule the meeting for you.
- For more information on the Email Settings section, please see our Inviting non-Meeting Maker users to meetings documentation.
- If you print to a Color printer, uncheck the Print in black and white only checkbox.
-
Notification tab:
- You may change the ways MeetingMaker notifies you when you are logged into MeetingMaker and someone proposes a meeting to you, or when a Reminder activates.
- In the Reminders section you can set the default Reminder time for any new meetings you create. The settings here will not change existing meetings - those need to be changed manually.
- In the Reminders section, Meetings are items you create and don't invite anyone to, while activities are scheduled items that multiple people are invited to.
-
Filters tab:
- If you use the Contact and ToDo Lists in MeetingMaker, you can create groups and priority names for those Lists here.
-
Labels:
- You can assign colors to each type of activity by using Labels. And if you want, you can customize those labels here.
- You can click on the different color boxes to change the colors for each label.
- You can also type in a name for each label if you wish.
- The changes will appear in the MeetingMaker Label dropdown box immediately after clicking OK, and they will stay with your preferences as you use MeetingMaker on different computers.
-
Colors:
- The colors listed here are the background colors you see in the areas where no meetings are scheduled.
- You can click on the color boxes to change them, similar to the boxes in the Labels tab.
Entering your User Information
You can change your user information so that others will know more about you. You can set your address, department, phone number, regular work hours, and other information. MeetingMaker also allows you to set normal work hours, which designate when you are normally available to meet. For instance if you work late on a particular day, or you work part-time, you can put this in your user information.
- Under the Edit menu, select User Info...
You will see a window similar to the one below:
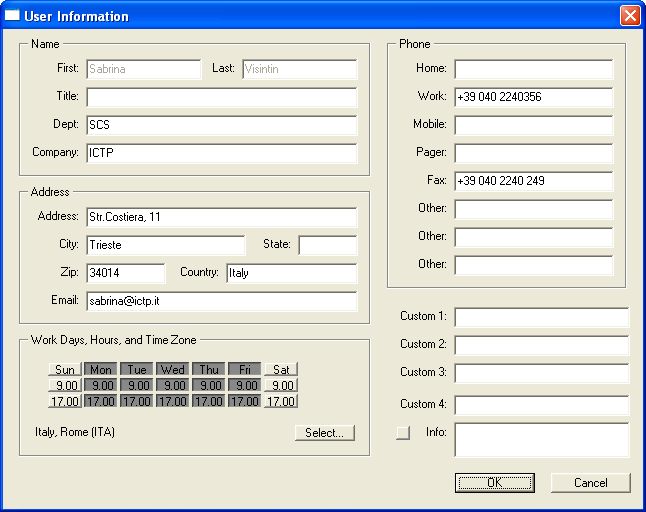
- Fill in the information to which you would like other ICTP Meeting Maker people to have access.
- Under Work Days & Hours set your regular work hours to help others know when you are or are not available to work.
- Click the Save button to save the information.
Changing Display Options (font, size, etc..)
-
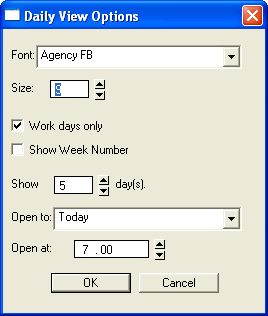
To change the text of activities, go to Edit > View Options. You can
change the font, font size, week number, with or without weekends, what
day the calendar opens to (for example, always open to have Monday be the first day), as well as the time it opens to.
- To change the Calendar view, there are several options under the main View menu, such as One Day, One Week (the default), Monthly, Text (new!), and Group View (formerly Master Calendar).
Changing Window Splits
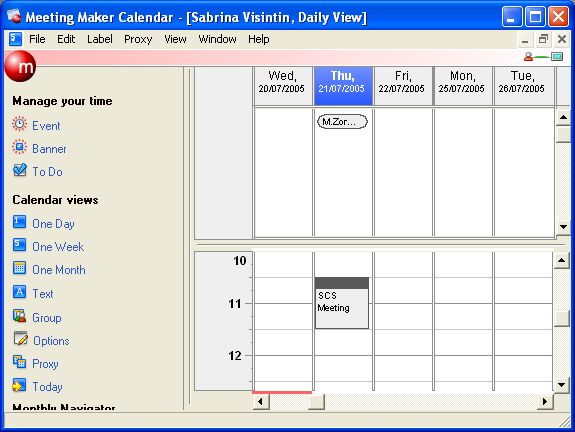
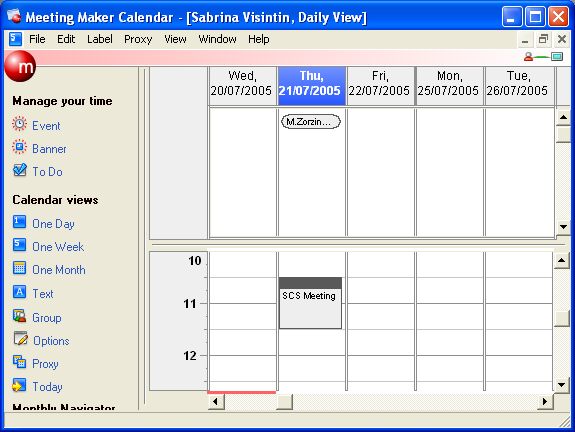
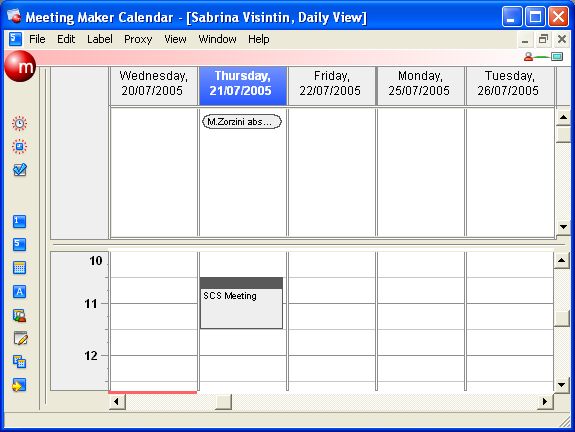
In MeetingMaker 8.5, you can modify the amount of space occupied by each of the three sections of the Calendar windows.
Between each of the three sections (Banners, Activities, and Options) you will see a line dividing each boxed section.
If you move the mouse onto that line, the mouse will change to a double-pointer icon and you can then click and drag
the line to the left and right (or top and bottom) to shrink one window and enlarge the other. The changes will be saved
the next time you login to meetingmaker, but only for your personal calendar. The changes made to windows of proxied
calendars will not be saved. Some examples are shown below.
Exiting Meeting Maker
- Windows: From the File menu, choose Exit.
- OS X: From the MeetingMaker Calendar menu, choose Quit Meeting Maker Calendar.
Using Activities and Banners
Creating Activities
- To put an activity on your schedule, you can either go to File > New Activity/Meeting or, in the calendar itself, click on the start time of the meeting and drag to the end time.
-
If you created an Activity from the File menu, an activity window will appear:

- If you did the click and drag in the calendar, you will be able to type in the name of the activity in the new item on your calendar. You can then double-click on the activity to get the dialog box that's shown above.
- Enter a short description of the activity for Title. Enter other information as needed, such as location and an agenda.
- If you want to set this Activity as a recurring event, such as a weekly meeting, select how often the meeting repeats from the Occurs Once dropdown menu. Then select the times that this meeting will be scheduled. If it doesn't have an end date, check the Ongoing checkbox that will appear.
- Under the Options, checking the item as Private will mark the activity confidential so that someone with proxy access to your calendar will not be able to see the details of this activity, just that you have something scheduled at that time. Checking the item as Flexible will indicate you may still be available for meetings at that time to someone who is proposing a meeting to you. For example, your student assistant's hours might be marked in your calendar as flexible because you need to know when she will be working for you, but you don't necessarily have to spend the whole time working directly with her.
- Click Create Activity to make the activity part of your calendar.
Editing Activities
- To edit an activity on your schedule, double-click on the activity in your calendar.
- If the activity you wish to edit is a recurring activity (the Title and Location fields will be un-editable), after opening the activity you must click the Change button in the bottom right part of the Window. When you click the Change button you will be asked which meetings you'd like to change. Select the option you want and click OK.
- Enter a short description of the activity for Title. Enter other information as needed, such as location and an agenda.
- If you want to set this Activity as a recurring event, such as a weekly meeting, select how often the meeting repeats from the Occurs Once dropdown menu. Then select the times that this meeting will be scheduled. If it doesn't have an end date, check the Ongoing checkbox that will appear.
- Under the Options, checking the item as Private will mark the activity confidential so that someone with proxy access to your calendar will not be able to see the details of this activity, just that you have something scheduled at that time. Checking the item as Flexible will indicate you may still be available for meetings at that time to someone who is proposing a meeting to you. For example, your student assistant's hours might be marked in your calendar as flexible because you need to know when she will be working for you, but you don't necessarily have to spend the whole time working directly with her.
- Click Update to save the changes to the activity.
Working with Banners
A banner is a flag that can be dragged across one or more days without interrupting your availability. For example, you might use a banner to mark days when your boss or co-worker is out of town, or to mark days you need to work on a project without having particular hours that need to be set aside for it. A banner appears in the Daily Calendar and Monthly Calendars as a streamer.
Creating Banners:
- Click Create Banner on the top left-side module.
-
Fill in the appropriate information and click Create Banner.
The banner will now appear in your Daily Calendar:

and the Monthly Calendar:

Editing a Banner:
- In the Daily or Monthly Calendar view, click on the text of the banner.
- In the window that pops up, edit the information, and click the Update button on the bottom right of the window.
Deleting a Banner:
- In the Daily or Monthly Calendar view, click on the text of the banner.
- In the window that pops up, click the Delete Banner button on the bottom left of the window.
Printing your calendar
- If your schedule is not already visible, select the type of calendar you wish to print under the main View menu.
- If you have a color printer and wish to print in color, go to Edit (Windows) or MeetingMaker Calendar (OSX) > Preferences > General and make sure that Print Black and White only is unchecked.
- If you wish to change the printer options, go to File > Page Setup. Here you can set Portrait or Landscape, and the Printer Margins. If you are not sure what the margins are for your printer, click the Printer button and select your printer, then in the Page Setup window, put 0 in each of the Margin areas and MeetingMaker will automatically set the margins to what the printer is able to do.
- Go to File > Print Schedule to bring up the Print Schedule window.
- Set the dates you wish to print, the format you wish to have printed, and how many days per page you want.
- If you wish to make more customizations, click on the Form Options button, then click on the tab for the format you selected to be printed. All other tabs will be blocked from making changes.
- You can now select the font, font size, the types of activites you want printed, and the range of hours you want printed. So if you want to just print work hours, set the times to 8:30am to 4:30pm. That way you won't see the extra hours on the printouts.
- Click OK to save the Form options, then click OK again to show the printer dialog box, then click Print to print the calendar.
Working with Others (Proxies, Favorites) in Meeting Maker
Creating a Favorites list
If you invite a lot of the same people to meetings and want a faster way to do it than constantly looking for them in the Public Directory, Favorites may be the answer!
Favorites works much like the FirstClass Addressbook. You can have groups of users as one Favorite, or have each user be a single Favorite.
-
To edit your Favorites go to Edit > Favorites.
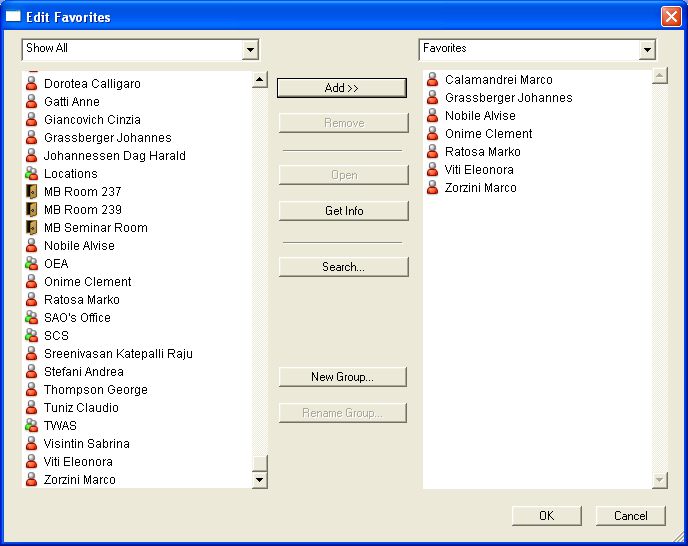
- On the left is all the items on the MeetingMaker server. The Show All dropdown item shows all the items on the server. If you click on Show All you can filter the list by Users, Groups, Resources, etc..
- On the right is your list of Favorites. If you already have items listed in the Favorites side, they might have different icons next to them. The icon with two bodies in it is a group, the icon with one body is a single user, and the computer monitor icon is a Resource (such as a classroom or vacation calendar for an office). You can double-click on the two-bodied icon to see who is a member of the group you created, but be careful because double-clicking on anything else in the righthand pane will remove them from the list!
- To add single users or resources to your quicklist, find them on the left and click the Add >> button in the middle.
- To add entire groups to your quicklist, select the group on the left, then click Add >> button in the middle. If you double-click on the group on the left, it will show the list of users in the group instead of adding the group!
- To create a group of users in your Favorites, in the middle row of buttons, click New Group, name the group, then add users to the group as normal. To get back to your main list of Favorites, use the dropdown menu on the top right and select Favorites. You can also create groups inside of groups.
- To remove items from your Favorites, select the item on the right and click the Remove button. Double-clicking on single users and resources will also remove them from the Favorites list.
Proposing a meeting
- Go to File > Create Activity/Meeting.
- Enter a title for the meeting in the Title box.
- Enter a place for the meeting in the Location box.
- Specify reminder and labeling options in the Options section. The options that you set here will only be valid for your calendar and do not apply to your guests' calendars. They will be able to set their own reminder and label for the meeting.
- If you would like to add comments or an agenda to the meeting, enter them in the Agenda section.
- Click on the Guests tab to invite other people to your meeting. To invite guests, click on the Edit List button at the bottom of the list of names. If you wish to add from your Favorites list, in the Add Guests to Meeting window, click on the dropdown box and select Favorites. For more detailed ways on inviting users, look at the Inviting Guests section below. Once all your guests have been added, click OK.
-
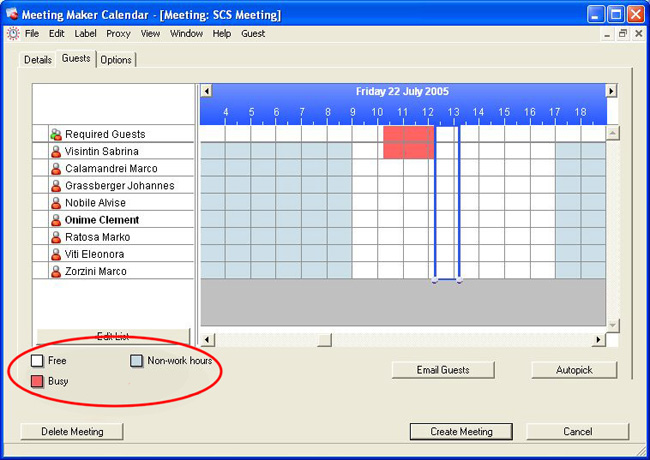
After you click OK, the guests will be added to your meeting, and their
availability will be shown in the Guests tab next to their name. The colors
in the available times match the colors in the legend at the bottom of the
window. You can change the colors for the legend by clicking on the square
color icons in the legend.
- Once everything is how you want it, click the Notify Guests button (it used to be Create Activity, but changes when you add Guests).
- If any of the guests either have meetings scheduled for that time or are not set to work during that time you will get a message saying that the required guests are unavailable. If you click Yes, it will continue anyway. If you click No, you can go back to the meeting, remove the guests in question and add them as Optional or CC instead of Required.
- After the guests have been invited, the meeting will appear on your calendar. You can now double-click on it to see the status of the invite for each user. There will be a green check mark if they accepted, a red X if they denied, and nothing if they didn't reply to the proposal yet.
- You can also look under the Options tab of the meeting to see if any of the guests have added comments to the meeting.
Note: Although all guests will receive a meeting invitation, the meeting will only appear on your guests' calendar after they have sent you an affirmative reply or if they have their calendar set to automatically accept meetings they have time for.
Responding to an invitation
When someone invites you to a meeting, or changes a meeting, you will receive a message in the Proposals window of MeetingMaker. To view your messages:
- Click on your main MeetingMaker Calendar to get to your account. This is to make sure you don't accidentally look at the proposals of an account you have read/write access to.
- Go to View > Proposals. This window automatically opens when you first login to meetingmaker, so you'll probably recognize it.
-
If there are any bold items in the Proposals window, click on the triangle next
to them and you will see the items for that Proposal section.
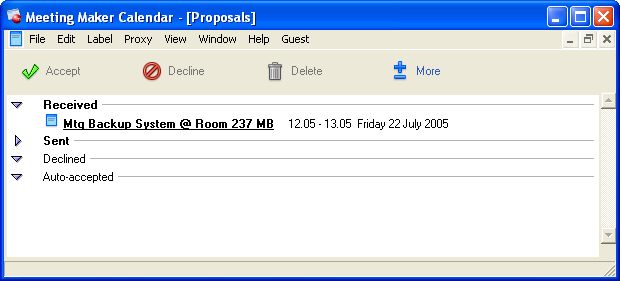
- Double-click on the item you want to look at.
- The time and agenda will be listed in the Details tab. The Guests tab shows who was asked to attend the meeting and who was CC'd. In the Options tab you can add notes that everyone will see, as well as change the reminder time and label for the meeting in your calendar.
- At the bottom of the meeting is the Can you attend? question. Click the appropriate response button (Yes, No, or I'll decide later) and click Reply.
- If you select I'll Decide Later, the meeting will stay in the Recieved Proposals, but will no longer be in bold.
- If you select No, it will move to the Declined section.
- If you select Yes, it will go to the Accepted section.
- If you wish to delete the Proposal item, click on it once to highlight it, then click the Delete icon in the Proposals window. Use caution with this as it cannot be undone!
- You may close the Proposals window at any time and get it back by going to View > Proposals.
Inviting Guests
When you are proposing meetings, you will need to choose the participants from the list of people who have MeetingMaker accounts.
- When creating or modifying a meeting, click on the Guests tab.
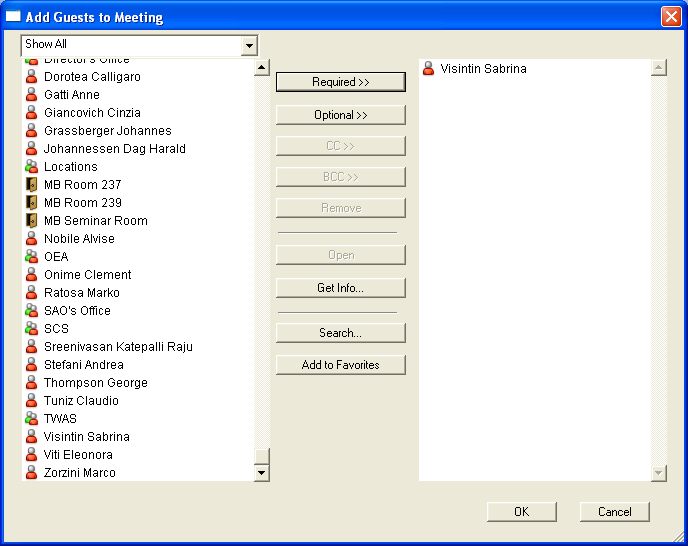
- Click on Edit List.
-
For each guest you want to invite, double-click that person's name. The name will appear in the list of Guests as a required guest. You can also select a user (by clicking once) and use the Required--> or Optional--> buttons to move them to your Guests list.
-
- Click on the Guests tab to check if there is a known conflict with this meeting. The Guests tab displays the guests' busy time in red, free time in gray, and time outside work hours in blue.
- When you are finished inviting guests and setting the Details and Schedule, click the Create Activity button. The window will close, and the meeting proposal will be transmitted to your guests and will appear in your calendar.
You can invite guests who are not users in your Meeting Maker environment to a meeting. External guests must be in your Address Book as contacts. If you have set your email preferences and entered a valid email address for an external guest, they automatically receive an email invitation to the meeting containing an iCalendar attachment. External guests with valid email addresses also receive email notifications of any changes you make to the meeting.
You can invite external guests to a meeting just like any other guests. You can filter your user list in the Add Guests to Meeting dialog box to only display Contacts to help you find external guests faster.
If you invite an external guest without a valid email address to a meeting, a message appears when you send the meeting invitation warning you that not all guests to the meeting will receive a meeting invitation. You must inform such guests about the meeting yourself. You can send an email summary of the meeting to an external guest even if you have not configured your Meeting Maker email preferences (Click Email Guest and Meeting Maker launches your default email client and creates a pre-populated email)
Changing an activity to a meeting
If you set up an activity on your own calendar and want to go back and turn that into a meeting with others, you can modify the activity by inviting guests to it.
- Double-click on the text of the activity you want to change. The activity window will pop up.
- If this is a recurring event, click the Change button and select the meeting options you wish to change.
- Click on the Guests tab.
- Follow the directions above for inviting guests.
Working with proxies
A proxy is another user who has access to your calendar. This user can view (and edit, if you give them that permission) your calendar and help you keep track of activities, meetings, and to-do items. He or she can also print your calendar. If you check any of your activities or to-do items as private, your proxies will not be able to view the name of your activity - they will only be able to see that you have something planned.
To be able to view someone else's calendar, that user must first give you permission to see their calendar. Once they have given you permission, you can add them to your Proxy Favorites for quick accesss from the Proxy menu.
Important: You should only choose people who need access to your schedule as your proxies. You do not need to be on a proxy list to invite or recieve invites from other users and they can usually see enough information in the Guests tab when they propose a meeting with you.
Most proxies are created so that their calendar is shared out to bosses or Administrative Assistants so that they can keep track of who is where and doing what during the day.
Allow others to see and/or edit your Calendar:
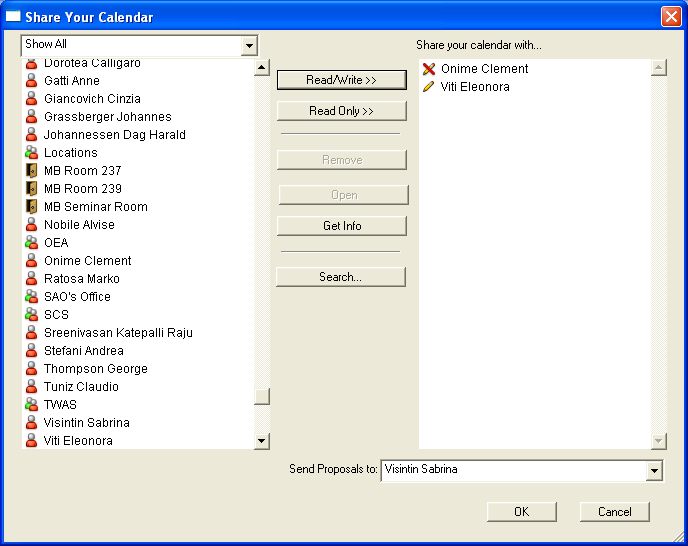
- From the Proxy menu, select Share Calendar...
-
In the left pane, select the name of the person you want to let see your calendar
and click either Read/Write or Read Only.
Read Only prevents the person you add from directly adding activities
to your calendar. They will still be able to invite you to meetings as usual.
-
Click OK.
View Calendars that you have been given proxy access to:
- From the Proxy menu, select Edit Favorite Proxies
- In the left pane, select the name of the proxy you want to add to the Proxy menu in the MeetingMaker Application. Usually you want to add everyone who has proxied you to your Favorites so they all show up in the Proxy menu.
- Click OK.
- If you look under the Proxy menu now, each calendar you added to your Favorites will be listed with Open in front of it. If you click on each Open calendar, a new window will appear with the proxied calendar.
- If there are calendars that you don't want in your favorites menu because you don't open them that often, you can still access them by clicking on the More Proxies option under the View menu. Select and Add the proxies you want to open, then click OK.