Personal tools
Document Actions
Mail Account Management
Table of contents
- Forwarding to a single address without keeping a local copy
- Forwarding to a single address keeping a local copy
- Forwarding to more than one address
- Disable forwarding
- Activate Vacation System
- Disable vacation system
- Enable/Disable globally any script
Forward all e-mail messages to a single address without keeping a copy on the ICTP mail server
(top of page)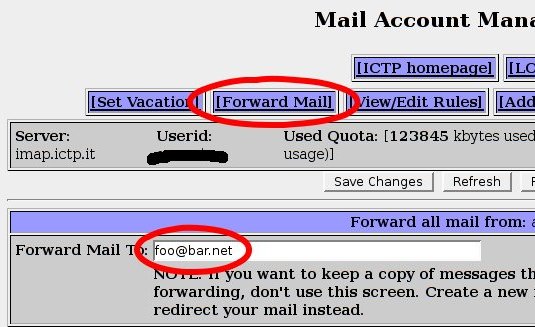
- Click on the [Forward Mail] tab
- Enter the email address in the Forward Mail To: field.
- Click on the Save Changes button
- Make sure that scripts are globally enabled. See the Enable/Disable globally any script section.
Forward all e-mail messages to a single address keeping a copy on the ICTP mail server
(top of page)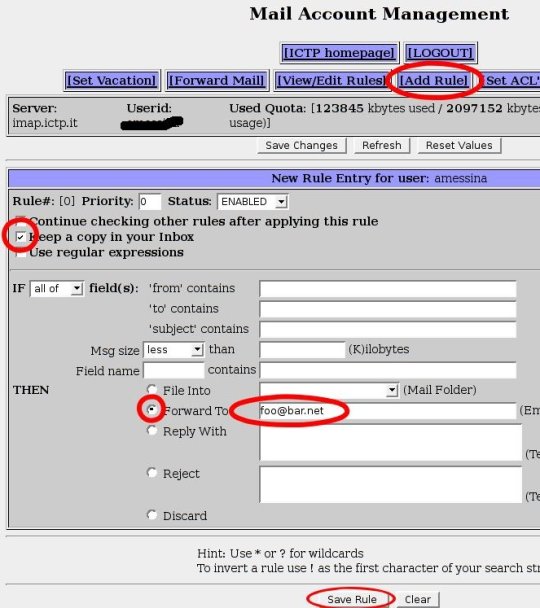
- Click on the [Add Rule] tab
- Select the Keep a copy in your Inbox checkbox
- Select the Forward To radio button
- Insert an email address into the Forward To field
- Click the Save Rule button
- Make sure that scripts are globally enabled. See the Enable/Disable globally any script section.
Forward all e-mail messages to more than one email address (with/without keeping a copy on the ICTP mail server)
(top of page)If you want forward all the email to more than one address, you need to repeat following instruction for each email address:
- Click on the [Add Rule] tab
- Select the Continue checking other rules after applying this rule checkbox.
- If you want to keep a copy of the email on the ICTP mail server, then select the Keep a copy in your Inbox checkbox
- Select the Forward To radio button
- Insert the an email address into the Forward To field
- Click the Save Rule button
Make sure that scripts are globally enabled. See the Enable/Disable globally any script section.
Disable forwarding
(top of page)- Click on the [Forward Mail] tab
- Delete any email addres in the Forward Mail To: field
- Click on the Save Changes button
- If you have defined more than one forwarding address, you will see the next one in the Forward Mail To: field. Repeat steps 2 and 3 until all addresses have been eliminated.
Activate Vacation System
(top of page)
- Click on the [Set Vacation] tab
- Make sure you select Yes on the Vacation Active?: radio button
- Write the Vacation Text that you want the senders to receive
- Normally you don't have to modify the Vacation Address text area, except if your ICTP address is mapped from another domain (e.g. @twas.org, @egrid.it)
- Make sure you select Yes on the Also add ALL ictp aliases radio button
- Click on the Save Changes button
Disable vacation system
(top of page)- Click on the [Set Vacation] tab
- Make sure you select No on the Vacation Active?: radio button
- Click on the Save Changes button
Enable/Disable globally any script
(top of page)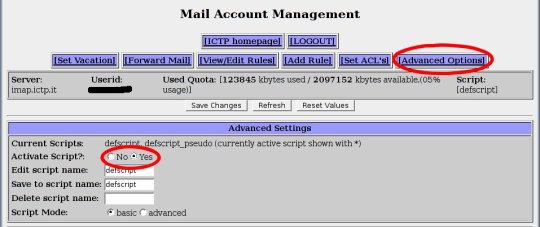
- Click on the [Advanced Options] tab
- Select Yes or No on the Activate Script?: field to globally activate or deactivate the forwarding/vacation system
- Click on the Save Changes button